
Updating an Ensoniq TS-10 or TS-12 with the latest Operating System
http://intrepiderie.com/intrepiderie_blog/upgrading_os_on_ensoniq_ts/
The official Service Dept instructions for Keyboard Techs are here:
My notes are as follows:
- OS 1 and 2 had a 2MB Upper EPROM and a 2MB Lower EPROM.
- OS 3 has a 2MB Upper EPROM and a 4MB Lower EPROM, so cutting/removing a resistor, cutting a trace, and jumping 2 pins is required in order to handle the new 4MB chip.
- Updated OS is needed for SCSI, GM, tempo track (song track 12), sound finder categories, and to save sequences and save the 120-programs and sample-banks along with it. The main feature I want is the tempo track.
Parts needed include:
-
2 new EPROMs
-
0-ohm resister (or wire)
-
Manual addendums for 2.0, 2.01, and 3.1
-
TSD-300 disk (contains EDT file with 120 GM programs)
Warning: This is just a blog entry. I am not a professional. There is no editor or fact-checker, so it is quite possible that there are inaccuracies. If you make a mistake, damage or injury could occur. If you don't have experience with this kind of stuff, don't do it. This blog is for entertainment purposes only. These are not official instructions.
Steps (continued):
-
Hold Presets buttons and press System i order to get the current OS version, jot it down.
-
Save all sounds, presets, and sequences before starting, because everything will get wiped.
-
Use EDM (discussed in another blog entry) to create 2 TSD-300 floppy disks.
-
Format 2 blank TS-10 floppies for later use.
-
Remove all cables and power.
-
Remove bottom cover of TS-10 or TS-12.
Warning: Use anti-static precautions for all remaining work. You can damage chips if they get zapped by static.
Disconnect cables (use color perm markers to note locations) from the digital board:
-
20-pin ribbon cable to the analog board (4090020301), upper-left.
-
34-pin ribbon cable to the disk drive, just below it.
-
6-pin cable to the patch select/wheel board, just below that.
-
20-pin ribbon cable to the keyboard, just below that.
-
34-pin ribbon cable to the SCSI board (4090020601) should be empty since I don't have SCSI on my TS-10.
-
20-pin ribbon cable to the jack board (4090020201), bottom-left.
-
9-pin cable to the power supply board (4090020401), upper-right.
-
7-pin cable to the keypad/display board (4090020101), just below it.
Video on digital board connections is here: https://www.youtube.com/watch?v=w-i1YZ6tsf8
Squeeze 5 white plastic standoffs (there may also be 4 screws to remove) with long needle-nose pliers to remove digital board.
Video on standoffs is here: https://www.youtube.com/watch?v=7s1__9uSbLM
On component side (side with all the chips, caps, transistors, and resistors showing):
Remove the 2 old EPROMS using scribe, make note of the direction of the notch.

Insert the 2 new EPROMS, with notch going the same way as the previous chips.

Upper EPROM (U6) is on left, Lower EPROM (U5) is on right.
Cut out or desolder the 0-ohm resistor from R1 18 location, just to the right of Lower EPROM, before getting to the square Motorola processor.
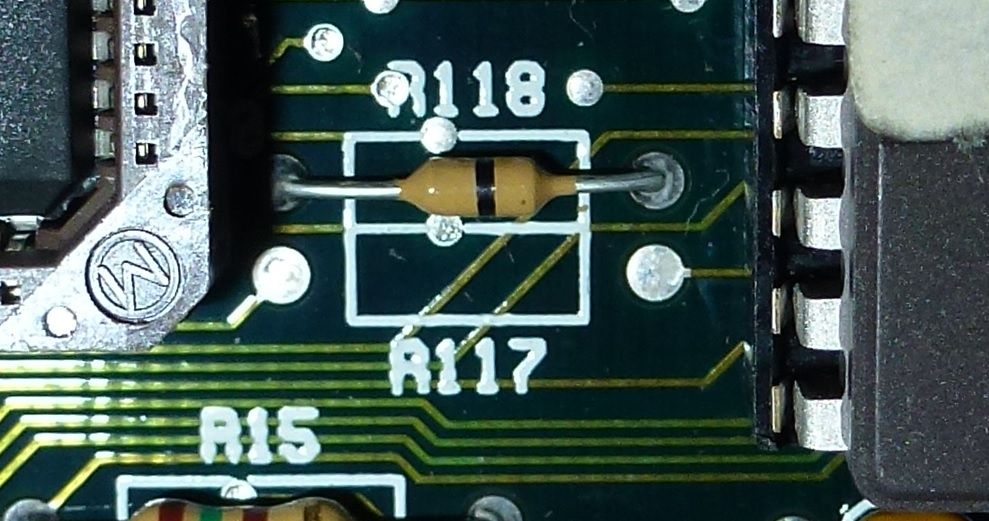
Install 0-ohm resistor (or wire) into R1 17 location instead, next to the old R1 18 location.
Video on EPROM chips is here: https://www.youtube.com/watch?v=9iJDIYA93X0
On solder trace side (side with no components showing):
-
Cut the curved trace (all the way through) coming off pin 31 (2nd from bottom right) of the Lower U5 EPROM. Make sure you can re-do trace later if this cut needs to be backed out.
-
Jumper pins (using short piece of wire or just solder it) 31 and 32 (bottom 2 on right) on the Upper U6 EPROM.
Video on cutting trace and placing jumper on pins is here: https://www.youtube.com/watch?v=S91hEnpUd3s
Putting everything back together:
-
Put back digital board and re-connect all ribbon cables. Now you will be glad that you marked everything so well.
-
Put the back cover into place and screw it back together.
-
Re-connect power and put in headphones to hear the new sounds.
-
Hold Presets button and press upper-left soft button to reinitialize.
-
Hold Presets buttons and press System to get the new OS version number.
For backup, save these files to the 2 floppies that you previously formatted:
-
60-SEQ/SONGS with 120 programs
-
120-PRESETS
-
SYSTEM-SETUP
-
SAMPLE-BANKS
Load a GM sequence and the patches 1-128 should all match up correctly as long as you turned on GM mode.
Go to Song track 12, and you will see that it can now be used to mixdown tempo changes.
You can now select patches via category, as long as the newer version of categorized instruments are loaded.
See if MSB and LSB are still either/or settings. Looks like this did not change, too bad. You can still only select MSB or LSB for the patch on a track playing external gear, not both. Looks like Ensoniq never fixed that, even with the latest OS.
You can now save a sequence, and it will ask to save the program patches along with that sequence.
You can now name files using the keys on the keybed, cool.
7-Feb-2017 Update: The trace cuts and jumper and new EPROMs and everything are working like a charm. I still use my Ensoniq TS-10 as my master keyboard controller and sequencer. I do not use the keyboard naming or GM features from the new OS. The feature I wanted, and use all the time, was the tempo track. The only thing that the TS-10 lacks is filter resonance sweeping, and ability to set both MSB and LSB when working with external tone modules. Floppies are fine, I actually prefer boxes of well-organized floppies to working with sketchy SCSI drives.
Response to Comments: Thanks for all for your comments. Rather than have a long thread of replies, I have deleted the comments and will respond in general below:
What is EDM: Ensoniq Disk Manager (EDM) is a tool created by Giebler many years ago to manage files on TS format floppy disks. There used to be ads in Transoniq Hacker newsletter, way before the Internet. It works using DOS machine (Win98 or earlier) and an internal floppy drive (not USB), so I run it from an old Win98 SE laptop that I have dedicated for running all my old retro floppy and sysex librarian programs that run under DOS. There may be other newer tools out there, but I cannot comment on those, as I have always used the Giebler software - I think you can still buy it even today.
What if your OS got wiped: With a unit like the ASR-10, the OS was on the floppy, so you could just get a new OS floppy to boot from. But with the TS, the OS is in the internal EPROMS, so if your OS is wiped, then something really bad happened like a surge that fried the chips. You can get the OS chips online. I am not going to mention the seller I used, because I cannot recommend them due to poor business-practices and they may no longer be around anyway. Do a search or look on eBay. Make sure the OS chips are socketed on your board (easily replaced), otherwise I would not try it because you need to de-solder all the pins and it is really difficult. Whenever I have vintage gear with un-socketed chips, I jut clip them off nice and level, throw away the old chip. and solder the new chip onto the old pins.